Lecture and Slideshow Recording
Recording simple audio/visual presentations can support learning online or as a supplement to face-to-face instruction.
Record Narration Directly in PowerPoint
Microsoft PowerPoint (for both Windows and Mac) includes a function to record narration. Narrated presentations can be saved as either a PowerPoint Slide Show or a video.
Help Guide: Microsoft's guide to narrating PowerPoint Presentations
Important Notes
- Saving voice-over PowerPoints as video is the preferred format (help article).
- Presentations saved as videos may be easier for students to view on mobile devices.
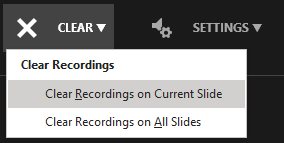
- Be careful of using the Clear command while recording! If you accidentally "Clear Recordings on All Slides," your audio will become unrecoverable.
Capture Lectures or Presentations with Zoom
Zoom, Illinois State University's video conferencing platform, can be used to record anything on your PC or Mac desktop, including presentations using PowerPoint and Keynote.
Instructors who intend to record in classroom spaces should first consult Learning Spaces and Audio/Visual Technologies to ensure that equipment is properly configured.
IT Help article: Recording a Zoom Meeting
Overview: Teaching with Zoom
Note: While the Center for Integrated Professional Development recommends accessing the Zoom through Canvas when creating and hosting meetings with students, stand-alone recordings like this are best achieved through the Zoom portal site at IllinoisState.Zoom.us.
Creating a Transcript
Instructors can create transcripts of recorded lectures and meetings using Otter, a free online tool.
- Log into Otter.ai and sign using Microsoft (this will allow you to use your University credentials).
- Upload your audio or video file to Otter for processing.
- When the file is complete, download the transcript and place it on Canvas for students to access
For details on how to sign in to Otter and create transcripts, explore this help guide.
How to Upload Recordings
Recordings should be uploaded into Canvas Studio.
Tips for Success
Students learn from a pre-recorded presentation differently than a live lecture. Maximize their success by:
Breaking up large presentations into digestible "chunks
- By reducing a long lecture into episodes 5 – 10 minutes in length, you give time for students to take notes and reflect upon the material.
- Shorter videos are easier for students to "scrub." They can more easily browse back and forth through the video for concepts they missed or wish to review.
Ask a question at the end of each episode
- Use a question to get students to think about the concepts they just saw. This is a great way to frame their reflection.
- For example, "Now that we've learned about the role of credibility in public speaking, can you name a public figure you think is credible, and why?"
- Ask simple questions that challenge students to summarize what they just heard, as a way of reinforcing what you, as the instructor, thinks are the most important takeaways.
Link episodes as part of the larger lesson
- At the end of your recording, summarize what students have learned and tease what they'll explore in the next segment.
- For example, "In this video, we've defined logos, ethos, and pathos. In our next episode, we'll explore how successful public speakers use these concepts to change hearts and minds."
Audio quality is important
- Even though there are visual elements to the presentation, your voice drives students' learning in this medium.
- Make sure you are recording in an environment as free of ambient noise as possible.
- Use a headset microphone when possible, instead of a computer's built-in mic.
- Do a test recording and make adjustments as needed to ensure the best audio quality possible.
Get Help
For technical assistance, please contact the Technology Support Center or call (309) 438-HELP.
Contact ProDev@ilstu.edu or call (309) 438-2542 for assistance teaching with these tools.
